Search your article
Salamba Sirasana

Salamba Sirsasana- 5
Salamba means with support. Sirsa means the head. This is the head stand pose, one of the most important Yogic asanas. It is the basic posture. It has several variations, which are described later as the sirsasana cycle. Its mastery gives one balance and poise, both physic ally and mentally. The technique of doing it is given at length in two parts ; the first is for beginners, the second for those who can remain balanced in the pose. Attention is specially directed to the hints on Sirsasana given after the two techniques.
Technique
1 . Spread a blanket fourfold on the floor and kneel near it.
2. Rest the forearms on the centre of the blanket. While doing so take care that the distance between the elbows on the floor is not wider than the shoulders.
3· Interlock the fingers right up to the finger-tips (Plate 176), so that the palms form a cup. Place the sides of the palms near the little fingers on the blanket. While going up on to your head or balancing, the fingers should be kept tightly locked. If they are left loose, the weight of the body falls on them and the arms ache. So remember to lock them well.
4· Rest the crown of the head only on the blanket, so that the back of the head touches the palms which are cupped. Do not rest the forehead nor the back but only the crown of the head on the blanket. To do this move the knees towards the head.
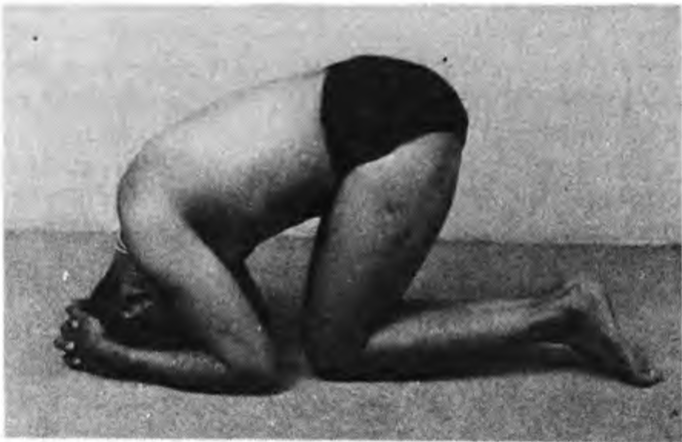
5· After securing the head position, raise the knees from the floor by moving the toes closer to the head.
6. Exhale, take a gentle swing from the floor and lift the legs off the ground with bent knees. (Plate 179.) Take the swing in such a way that both feet leave the floor simultaneously. When once this position is secured, follow the various stages of the leg movements depicted as follow:

7. Stretch the legs and stand on the head, keeping the whole body perpendicular to the floor.
8. After staying in the final position to capacity, from one to five minutes, flex the knees and slide down to the floor in the reverse order as in above poses.
9· A beginner must have the assistance of a friend or do the asana against a wall. While practicing against a wall, the distance between it and the head should not be more than 2 or 3 inches. If the distance is greater, the spine will curve and the stomach will protrude. The weight of the body will be felt on the elbows and the position of the head may change. The face will appear to be flushed and the eyes either strained or puffed. It is, therefore, advisable for a beginner to do the head stand in a corner where two walls meet, placing the head some 2 to 3 inches from either wall.
10. While doing the head stand against a wall or in a corner, the beginner should exhale, swing the legs up, support the hips against the side of the wall and move the feet up. In a corner, he can touch the heels tv either side of the walls. He should then stretch the back vertically up, gradually leave the support of the wall and learn to master the balance. While coming down, he can rest the feet and hips against the wall, slide down and kneel, resting his knees on the floor. The movements of coming down and going up should be done with an exhalation.
11 . The advantage which the beginner has of balancing in a comer is that his head and legs will be in the right angle formed by the walls, and he will be sure of his right position. This will not be the case if he balances against a straight wall. For while his balance is insecure he may sway from the wall, or his body may tilt or swing to the stronger side, while his legs may rest against the wall with a bend either at the waist or the hips. The beginner will not be in a position to know that he has tilted to one side, much less to correct it. In time he may learn to balance on the head, but by habit his body may still tilt or his head may not be straight. It is as hard to correct a wrong pose in the head stand as it is to break a bad habit. Moreover this wrong posture may well lead to aches and pains in the head, neck, shoulders and back. But the two walls of a corner will help the beginner to keep the asana symmetrical.
12. When once balance is secured, it is advisable to come down to the floor with the legs straight (that is, without bending the knees at all) and with a backward action of the hips. At first, it is not possible to go up and come down without bending the legs, but the correct method should be learnt. Once the beginner has confidence in the head stand, he will find it more beneficial to go up and down with the legs together and straight, without any jerks.
13· I t takes time for the beginner to become oriented to his surroundings while he is balancing on his head. Everything will seem at first to be completely unfamiliar. The directions and instructions will appear confusing and he will find it an effort to think clearly or to act logically. This is due to fear of a fall. The best way to overcome fear is to face with equanimity the situation of which one is afraid. Then one gets the correct perspective, and one is not frightened any more. To topple over while learning the head stand is not as terrible as we imagine. If one overbalances, one should remember to loosen the inter locked fingers, relax, go limp and flex the knees. Then one will just roll over and smile. If the fingers are not loosened they will take the jerk of the fall which will be painful. If we do not relax and go limp while falling we hit the floor with a hard bump. If we flex the knees, we are unlikely to graze them in the fall. After one has learnt to balance against a wall or in a corner, one should try the head stand in the middle of the room. There will be a few spills and one must learn the art of falling as indicated above. Learning to do S’iraasana in the middle of a room gives the beginner great confidence.
Technique for those who can balance – 8
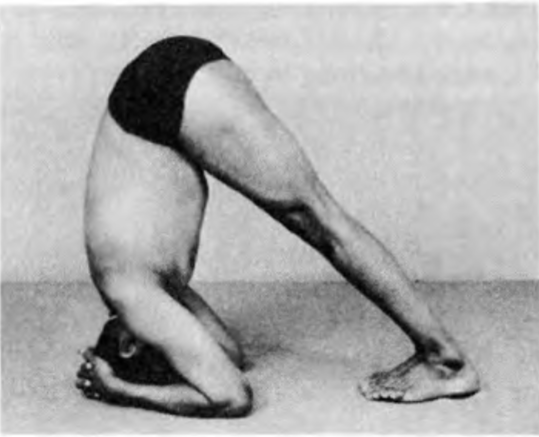
1. Follow the technique described for beginners from positions 1 to 4·
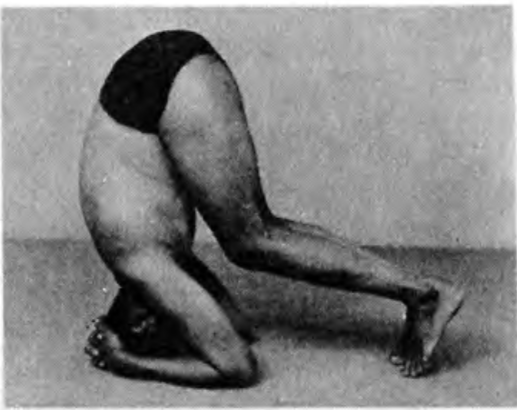
2. After securing the head position, stretch the legs straight by raising the knees from the floor. Move the toes nearer to the head and try to
press the heels to the floor, keeping the back erect. (Plate I 86)
3· Stretch the dorsal or middle region of the spine and stay in this
position for about 30 seconds while breathing evenly.
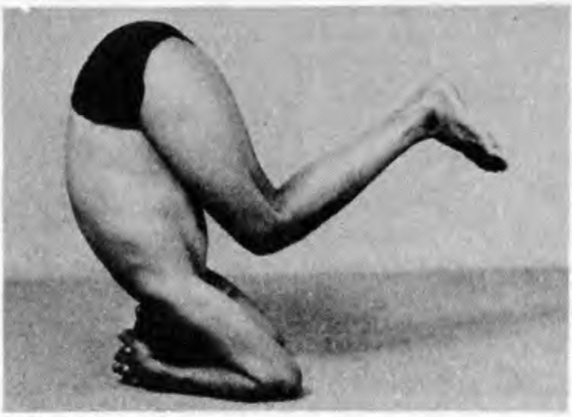
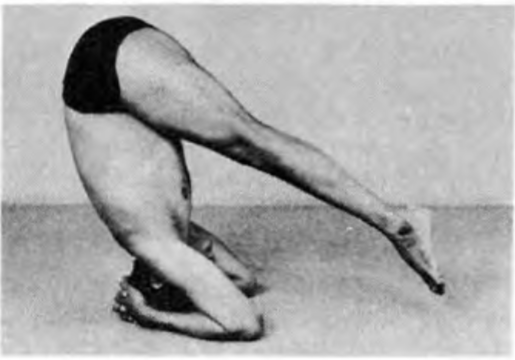
4· Exhale, raise the heels and take the toes off the floor with a back ward movement of the hips. Raise both legs simultaneously, keeping them poker stiff. (Plate I 87.) Take a breath.
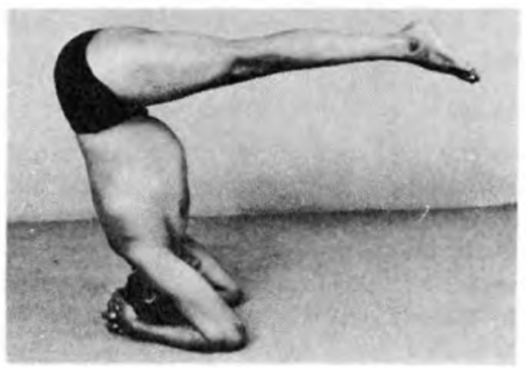
5. Again with an exhalation move the legs up until they are parallel to the floor. This position is called:
Urdhva Dandasana – 8
(Urdhva=up, danda staff)
Stay in this position for 1 0 seconds with normal breathing.
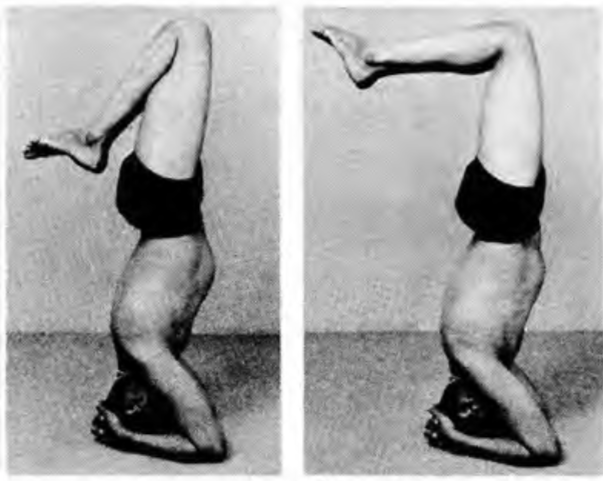
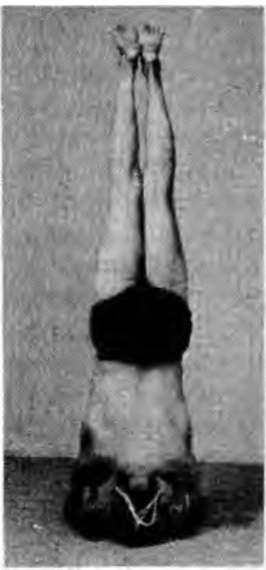
6. Exhale, move the legs up as in Plate r89, and then pull them up to the vertical position. Stay in this pose from I to 5 minutes while breathing evenly.
7. Come down gradually, observing the above technique in a reverse order. Rest the feet on the floor, bend the knees and raise the head from the floor or blanket.
8. While coming down, it is advisable to stay in Urdhva Dandasana according to capacity up to one minute while breathing normally. In this position, the neck and trunk will not be perpendicular to the floor but will sway slightly backwards. The neck, shoulders and spine will be put to a very great strain and in the initial stages one cannot stay with the legs parallel to the floor for more than a few seconds. The stay will become longer as the neck, shoulders, abdomen and spine become stronger.
Hints on Sirsasana
1.In Sirsasana the balance alone is not important. One has to watch from moment to moment and find out the subtle adjustments. When we stand on our feet, we need no extra effort, strength or attention, for the position is natural. Yet the correct method of standing affects our bearing and carriage. I t is, therefore, necessary to master the correct method as pointed out in the note on Tadasana. In Sirsasana also, the correct position should be mastered, as a faulty posture in this asana will lead to pains in the head, neck and back.
2. The whole weight of the body should be borne on the head alone and not on the forearms and hands. The forearms and hands are to be used only for support to check any loss of balance. In a good pose you feel a circle, about the size of an Indian rupee, of the head in contact with the blanket on the floor.
3· The back of the head, the trunk, the back of the thighs and the heels should be in a line perpendicular to the floor and not inclined to one side. The throat, chin and breast-bone should be in one line, otherwise the head will tilt to one side or move forward. As regards the interlocked hands behind the head, the palms should not be stuck into the head. The upper and the lower sides of the palms should be in a line, otherwise the crown of the head will not rest on the floor correctly.
4· The elbows and the shoulders should be in a line and the elbows should not be widened. The shoulders should be kept as high above the floor as possible by moving them up and stretching them sideways. In order to learn the correct shoulder stretch, release the interlocked fingers and remove the hands from behind the head and widen the wrists from the forearms, keeping the elbows stationary. Place the wrists on the floor with the palms facing up, touch the shoulders with the fingers, keeping the wrists on the floor and maintain the balance. This will not only improve the balance but also prepare you for the other Sirsasana poses described later.
5· As to the position of the trunk, the dorsal region should be pushed forward as well as up. The lumbar (waist) and pelvic regions should not be pushed forward, while the trunk from the shoulders to the pelvis should be kept perpendicular. If the pelvic area juts forward, it means that you are bearing the weight of the body not on the head alone but also on the elbows for you have not stretched the dorsal region (the chest) correctly. When viewed from the side, the body from the neck to the heels should appear straight.
6. As far as possible try and join the thighs, knees, ankles and toes. Stretch the legs fully, especially the back of the knees and thighs. If the legs swing back tighten the knees and the lower median portion of the abdomen above the pubes. This will keep the legs perpendicular. Keep the toes pointing up. If the legs swing forward, stretch the dorsal region and push the pelvic area slightly back until it is in line with the shoulders. The body will then feel light and the pose will be exhilarating.
7· While going up or holding the head stand the eyes should never become bloodshot. If they do, the pose is faulty.
8. The time limit for Sirsasana depends upon individual capacity and the time at one’s disposal. One can hold it comfortably from 10 to 15 minutes. A beginner can do it for 2 minutes and go up to 5 minutes. It is always difficult for a beginner to balance for one minute, but once he succeeds he can be sure that from then on he will be able to master Sirsasana soon.
9· While going up or coming down, move both legs together, inch by inch. All the movements should be done with exhalation. Inhale while waiting in a position. The effect of going down and coming up straight without bending the legs at the knees is that harmonious slow movement is gained and the flow of blood to the head is controlled. The face does not flush from jerky and fast movements, as the flow of blood to the waist and the legs is also controlled. Then there is no danger of losing balance from giddiness or numbness of the feet when one stands up immediately after the head balance. In course of time the whole movement of going up, staying and coming down should become as effortless as possible. In a perfect Sirsasana your body feels completely stretched and at the same time you experience a feeling of complete relaxation. I have taught this pose to a lady of 65 who was suffering from glaucoma. Now she finds the eyes are completely rested and the pain in them is much lessened. Medical examination revealed that the tension in the eyeballs had decreased. I am mentioning this to prove the value of the correct head stand.
10. It is always safe to perfect Sarvangasana first before attempting Sirsasana. If the standing poses described earlier and the various movements of Sarvangasana and Halasana are mastered first, Sirsasana will come without much effort. If these elementary asanas have not been mastered, the period taken to learn Sirsasana will be longer.
11. After one has learnt to balance in Sirsasana, however, it is prefer able to perform Sirsasana and its cycle (Plates I90 to 2I8) first before practicing any other asana. This is because one cannot balance or hold the head stand if the body is exhausted by doing other poses or if the breathing becomes fast and shaky. Once the body is tired or the breathing is not free and easy, the body will shake and it will be difficult to maintain the balance. It is always better to do Sirsasana first when one is fresh.
12. Sirsasana and its cycle should always be followed by Sarvangasana and its cycle. It has been observed that people who devote themselves to Sirsasana alone without doing the Sarvangasana poses are apt to lose their temper over trifling things and become irritated quickly. The practice of Sarvangasana coupled with Sirsasana checks this trait. If Sarvangasana is the Mother, then Sirsasana may be regarded as the Father of all asanas. And just as both parents are necessary for peace and harmony in a home, so the practice of both these asanas is essential to keep the body healthy and the mind tranquil and peaceful.
Effects
The ancient books have called Sirsasana the king of all asanas and the reasons are not hard to find. When we are born, normally the head comes out first and then the limbs. The skull encases the brain, which controls the nervous system and the organs of sense. The brain is the seat of intelligence, knowledge, discrimination, wisdom and power. It is the seat of Brahman, the soul. A country cannot prosper without a proper king or constitutional head to guide it; so also the human body cannot prosper without a healthy brain.
The Bhagavad-Gita says : ‘Harmony (sattva), mobility (rajas), inertia (tamas), such are the qualities, matter-born; they bind fast, 0 great armed one (Arjuna), the indestructible dweller in the body.’ (Fourteenth Discourse, verse 5.) All these qualities stem from the brain, and some times one quality prevails and sometimes the others. The head is the centre of sattvic qualities which control discrimination; the trunk of Rajasic qualities which control passion, emotion and actions; and the region below the diaphragm of tamasic qualities which control sensual pleasures like the enjoyment of food and drink, and the thrills and pleasures of sex. Regular practice of Sirsasana makes healthy pure blood flow through the brain cells. This rejuvenates them so that thinking power increases and thoughts become clearer. The asana is a tonic for people whose brains tire quickly. I t ensures a proper blood supply to the pituitary and pineal glands in the brain. Our growth, health and vitality depend on the proper functioning of these two glands. People suffering from loss of sleep, memory and vitality have re covered by the regular and correct practice of this asana and have become fountains of energy. The lungs gain the power to resist any climate and stand up to any work, which relieves one from colds, coughs, tonsillitis, halitosis (foul breath) and palpitations. It keeps the body warm. Coupled with Sarvangasana movements , it is a boon to people suffering from constipation. Regular practice of Sirasana will show marked improvement in the haemoglobin content of the blood.
It is not advisable to start with Sirsasana and Sarvangasana when one suffers from high or low blood pressure. Regular and precise practice of Sirsasana develops the body, disciplines the mind and widens the horizons of the spirit. One becomes balanced and self-reliant in pain and pleasure, loss and gain, shame and fame and defeat and victory.
The Sirsasana Cycle
In Sirsasana there is a variety of movements which can be practised at one stretch after staying in Salamba Sirsasana for not less than 5 minutes according to one’s capacity. One may practice for 5 to 15 minutes and then perform these various movements for 20 to 30 seconds on each side at a time.